

Realtek HD Audio Manager is the heart of the audio system of your computer or laptop. Often people do not give the credit it deserves as people are not aware of how much powerful it is.
It is essentially the Graphic User Interface of Realtek HD Audio Driver, which is the default sound driver of most computer sound cards.
Realtek HD Audio Driver supports six-channel Digital to Analog Audio Converter with 16.20.24 bit Pulse Code Modulation in 5.1 audio channel.
Without complicating things, Realtek Audio Manager is the reason you can listen to your favourite podcast and sing along with the music of your choice.

But with the latest operating system updates, people are getting some issues with the audio manager.
Users have reported that many times the icon of Realtek HD Audio Manager goes missing or could not find it in the taskbar.
A few people also could not find the audio manager in the Windows Search option. All these problems can be solved by just updating the software or reinstalling it.
Contents
Everything You Need to Know About Realtek HD Audio Manager
File Location Of Realtek HD Audio Manager

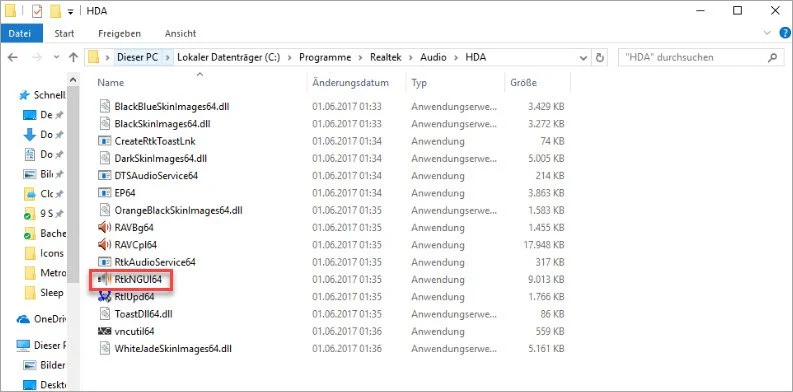
In case you cannot find the software in the Windows Search feature the default installation location is
1. Go to C:\Program Files\Realtek\Audio\HDA”
2. Double-click on RtkNGUI64.exe. Then you’ll open Realktek HD audio manager.
If you still can’t find Realtek audio manager, you may need to reinstall Realtek audio manager by updating your Realtek HD audio driver.
How to Reinstall Realtek HD audio manager

Windows automatically updates audio and video manager and drivers, but sometimes it fails.
In that case, you need to force Windows to check and download if any updates are available.
To do so click on the Start button and type ‘Device manager’. Click on that when it shows up in the search result.
Then click on the arrow icon next to ‘Audio inputs and & outputs’. It will show all the audio devices connected to your computer.
There will be an option with a similar name to ‘Speakers (Realtek High Definition Audio)’. Right-click on that and click on ‘Update driver’.
Then click on ‘Search automatically for updated driver software’. Windows will start looking for updates and install them itself.
Install Realtek HD Audio Driver Manually
But sometimes the latest update is not the best one to use or maybe not be provided by your motherboard and you are missing out on the best audio quality your computer can provide. If that is so, you have to manually install the driver of your choice.
Tenforums always provides links to the latest Audio Driver released from Microsoft. They also explain the differences between old and new updates.
Read through their site so you can make a better decision about which one will be the best for you.

When you download the drivers they will be in CAB format. So you need to extract the file into its own folder to install.
For that, you need an extraction tool like WinRar. After extracting open ‘Device Manager’ again, right-click on the ‘Speaker (Realtek High Definition Audio)’ and click on the ‘Update driver’ option.
On the next pop-up menu click on ‘Browse my computer for driver software’. On there click ‘Let me pick from a list of available drivers’.
Click ‘Have disk’ and then go to the folder you extracted the software earlier. Look for the first file with ‘inf’ file format and select that to install.
After installing the software you might also need to restart your computer to complete the process.
Conclusion
That should get you up to speed with the mysterious workings of Realtek HD Audio Manager and its drivers.
It’s worth remembering that Windows is generally good at updating and matching up the right audio driver for your PC, so if you’re happy with your sound quality and have no issues, then there’s no point in doing a lot of dabbling.
Even if the whole process takes a bit of time, if you follow the article throughout your drivers should be updated now.
Windows generally update these kinds of drivers automatically most of the time, so if you are already happy with your audio output, it is to best not to tinker with the drivers.
But it is always better to know about all these options beforehand.
Have something to say about this article? Comment below or share it with us on Facebook, Twitter, or our LinkedIn.

![How to Solve [pii_email_fac20b28ca7fd86484f1] Error Code](https://techstorify.com/wp-content/uploads/2022/01/How-to-Solve-pii_email_fac20b28ca7fd86484f1-Error-Code-218x150.png "How to Solve [pii_email_fac20b28ca7fd86484f1] Error Code")


