If you a frequent Windows user, you must be familiar with the horrific Blue Screen error. This dreaded error is also called the “Blue Screen Of Death” (BSOD). There are over 500 BSOD errors in Windows 10 and 8 Operating systems. One of the most common BSOD errors is the Critical process died with the error code 0x000000EF.
This error occurs when your system runs through a potential danger and the system warns the user to prevent the damage of the system.
When your system runs into the Critical process died error, it shows the following messages:
- Your PC ran into a problem and needs to restart. We’re just collecting some error info, and then we’ll restart for you.
- If you’d like to know more, you can search online later for this error: CRITICAL_PROCESS_DIED
BSODs errors are rare now due to stable Operating systems. However, you might still encounter this problem because the critical component of Windows data has been modified when it should not have been.
In this guide, we have shared everything about the BSOD error Critical Process Died Windows 10 and how to fix critical process died?
Contents
- What Is Critical Process Died Error?
- What Causes Critical Process Died Error?
- How To Fix Critical Process Died Error?
- Solution #1: Reboot PC In Safe Mode
- Solution #2: Restore Your System To Previous State
- Solution #3: Perform SFC Scan
- Solution #4: Run Full Antivirus Scan
- Solution #5: Run DISM (Deployment Imagining and Service Management Tool) to Repair Corrupt Files
- Solution #6: Updated Drivers
- Solution #7: Uninstall Windows Updates
- Solution #8: Use Partition Disk Error Checker
- Bonus Tip: Reinstall the Operating System
- Conclusion:
What Is Critical Process Died Error?
Critical process died error is the unexpected and most common cause of BSODs. You can easily identify the critical process died error windows 10 because the screen shows error 0x000000EF.
One of the common causes of this error is the background process of Windows that becomes corrupt or does not get modified.
It is still uncertain of what may cause this error to occur as there might be various reasons. You never know what is causing BSODs on your system.
Here are some of the possible causes of Critical Process died error in Windows 10/8/7.
What Causes Critical Process Died Error?
From faulty driver installation to memory loss or Windows updates, Windows10 critical process died error could be the reason.
This error is seen when the Windows operating system process is suddenly crashed or ends due to some corrupted files of faults. Majority of critical process died error occurs when a user is playing games.
Sometimes the reason might be graphic or sound cards which cause bugs. The installation or printers or wireless communications could potentially affect the system process and shown BSOD error.
Hence, we have talked about some major causes of Critical Process Died Error in Windows 10.
- Critical Process Died Error After Windows Update: This error occurs when a user updates the Windows operating system. Various Microsoft forums discussion threads have shared the Windows update issue that leads to Critical Process Died error.
One user reported:
“Whenever I try shutting down my HP Windows 10, I get Stop Code; Critical Process died. I need to always force stop when it is 100% and then restart.”
- Critical Process Died Error When PC Wakes From Sleep: Some users also reported that the critical_process_died in all versions of Windows occurs when they resume PC from sleep. Thus, they are unable to use their system.
The user reports here:
“After waking up from standby always a BSOD Critical Process Died occurred, after upgrading to 1709.”
- Critical Process Died Error After Login: When you enter login and password details, the critical process died error will likely to turn Blue screen error.
- Critical Process Died Error After Reboot: After the reboot process, when a user switch on the system, Blue screen of death error appears.
- Critical Process Died While Gaming: One of the most common encounters of BSOD error Critical_process_died while playing various games due to error in sound cards and graphic cards.
Well. There are various solutions to the Critical process died error in Windows 10.
How To Fix Critical Process Died Error?
No matter the reason is; from faulty driver to corrupt files or viruses, the critical process died error is important to solve.
It can consequently affect your system causing various errors and Blue screen or even your Windows causing a nuisance.
So, how to troubleshoot the critical process died error?
Solution #1: Reboot PC In Safe Mode
Before trying anything, the best way to troubleshoot this error is by trying the PC reboot in safe mode.
Before even login, your system might land up in Critical Process Died Error. One of the most possible cause is the corrupted driver when Windows loads up. To fix this error, you need to enter Safe Mode and perform reboot.
Here is how you should enter the Safe Mode in Windows 10:
- Restart Windows10 and try to perform reboot several times to enter the troubleshoot task. Alternatively, you can enter the safe mode by pressing Shift +F8 when the Windows10 starts loading. From the recovery mode, switch to the Safe mode option.
- In the Advanced option from Troubleshoot option.
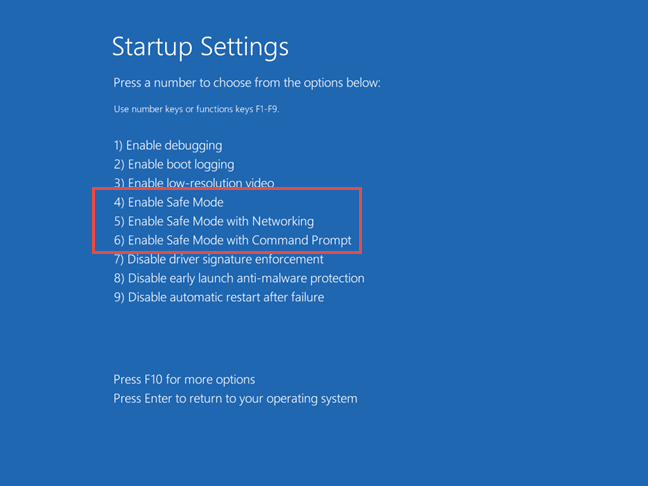
- From the Advanced options, Click on Startup Settings.
- Click On Restart and you will have various options on the screen.
- From the list of options, choose Enable Safe Mode to enter the safe mode of your PC.
Once you have entered the Safe mode and performed the system reboot, the next step is to perform a clean reboot of your PC. In the System Configuration, you might want to perform the clean boot to close all the ongoing processes.
On rebooting, the system will use the minimum number of drivers and to start your PC and the chances of critical process died error reduces.
Here is how to perform system reboot in Windows10:
- Press Windows+R to open RUN dialog box.
- In the RUN dialog box, type msconfig and press Enter.
- In the System Configuration option, click on General Tab.
- Check two boxes under the General tab; “Load system services” and “Use Original Boot Configuration”.
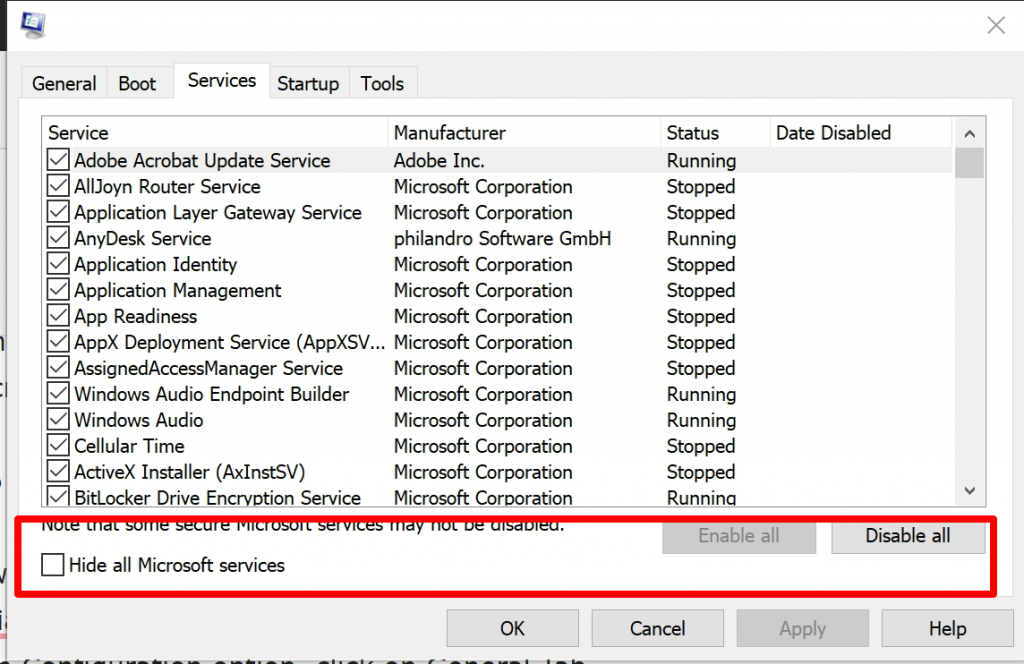
- In the next step, had to Services tab. Check on “Hide All Microsoft Services” box.
- Click on Disable All and press OK to Apply changes.
This will temporarily resolve the critical_process_died error in your Windows system. If the problem persists too often, read out the next step.
Solution #2: Restore Your System To Previous State
Your system might also run into critical_process_died error if you have updated or installed any system driver. Even the Windows updates can cause the Critical Process died error to occur.
Hence, you should consider the system restore to restore the previous state of your PC. This will remove the updates causing the BSOD error to occur. Don’t worry about losing important data. Windows creates a backup of files and folders before any major driver updates.
However, you must also create a backup in your external hard drives. So, how to perform a system restore?
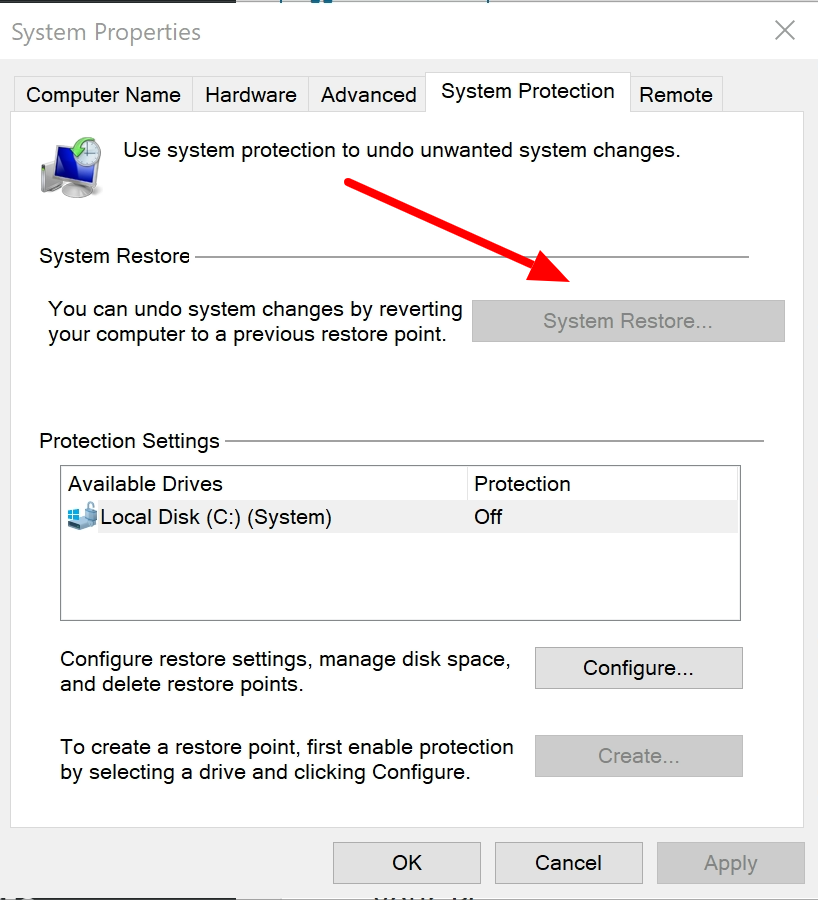
- In the Windows search box, type “System Properties”.
- You can also search for Create a System restore point. In the System Properties tab, look for the System Protection tab.
- On clicking System Restore, you will get all the restore points that been created.
- Out of various restore points, select any of the restore points that you want to use on your PC.
- Confirm the System Restore and Click on Finish to perform the restore on your PC.
- Confirm the changes and restore will take place.
Some of your files or apps might get deleted in creating the restore. Perform a thorough scan of your Windows10 to check for the drivers that might get deleted.
Solution #3: Perform SFC Scan
Majority of Windows related problems can be solved by performing the SFC scan. Some corrupt files may lead to override the protected files.
Performing a System Scan using CMD prompt will detect and extract the correct file and replace the missing file with the new ones.
However, it is not always possible that the critical process died error could be resolved using the Windows PowerShell terminal window (or an elevated command line). SFC or System
File Checker is a file utility which scans and checks for all the corrupted and restore the files in Windows. The SFC comes under the Windows Resource Protection (WRP) and is mostly responsible for preventing the important files and folders and installed as Operating system.
To run the system command prompt, follow the steps given below:
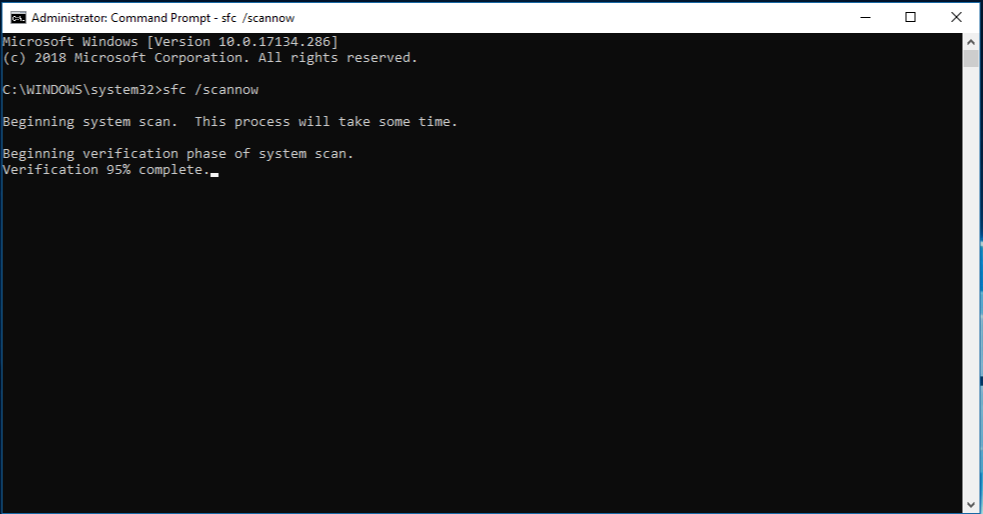
- In the Search box, type Command Prompt and right-click to choose Run as administrator. This will open the command prompt box.
- In the command prompt box, type the command sfc /scannow and press Enter.
- Wait for a while till the command prompt runs.
- Once the scan is completed, check the file problems by running the disk checker command.
- Type chkdsk /r and hit enter, then press Y to confirm a scheduled check on your PC.
- Restart and reboot your PC once you type in the command chkdsk. With chkdsk, your system will run a scan and check files.
Solution #4: Run Full Antivirus Scan
Some malware, spyware or adware can alter the system files making it usable and causes the Critical process died error. Running an antivirus scan can detect the presence of Spyware and Adware in your system.
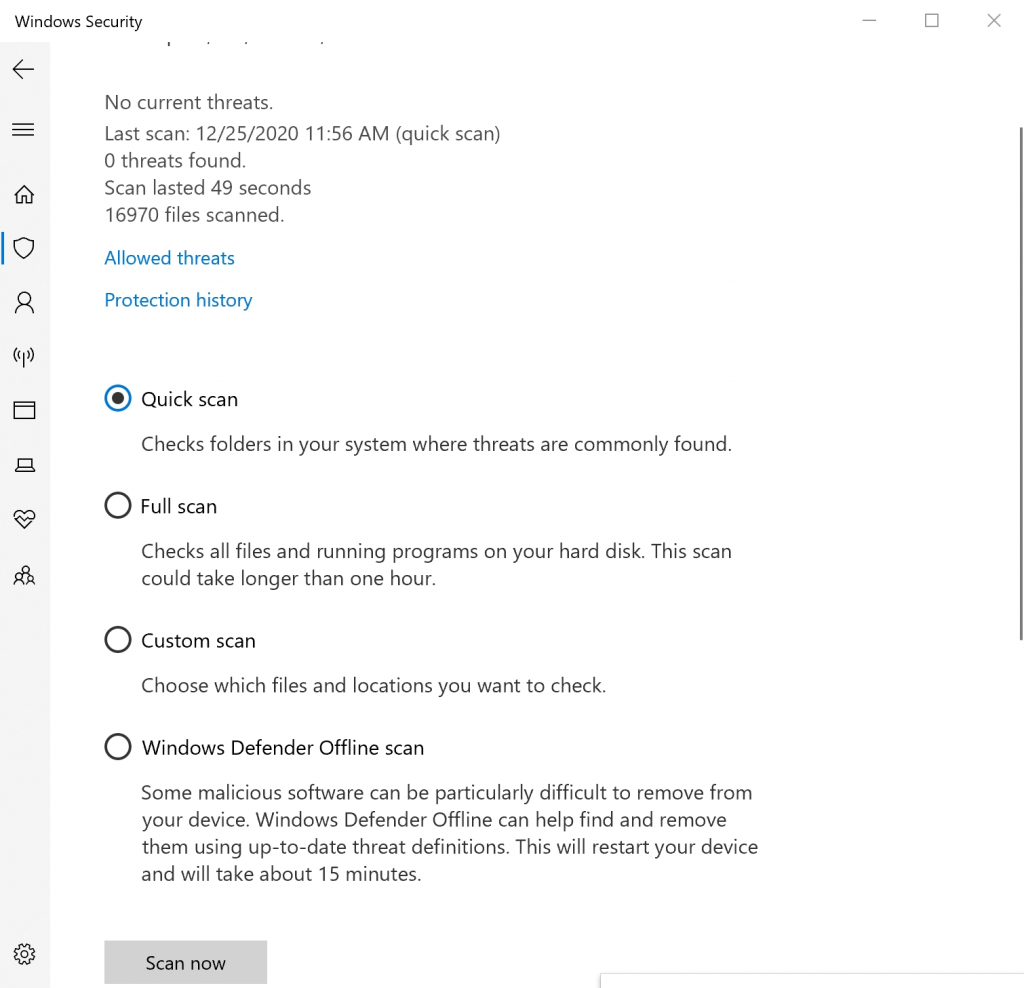
To run a deep full system scan, you can use any third-party antivirus software or even Windows Defender Firewall.
- In the Search box, type Windows Defender Firewall Security Settings.
- Click On Open Windows Security Settings and a new dialog box will open.
- A new dialog box will open in the left pane. Click on Virus & Threat Protection to choose the scan option.
- From the list of options, choose Full Scan to run the full system scan of your PC.
- If you find any threats or issues in a full system scan, remove the errors by deleting it.
Alternatively, you can also choose from the list of Best Antivirus software and perform full scan. In case of any threats or malware, you should be able to troubleshoot the problem. You must also try disabling the flash driver, or install an ad-blocker to stop such threats or malware.
If this doesn’t resolve the Critical Process Died Error Windows 10, you can move on to the next step.
Solution #5: Run DISM (Deployment Imagining and Service Management Tool) to Repair Corrupt Files
If the Critical Process Died error still persists after running the sfc scan, you can use the utility command DISM.
This command is more efficient in fixing various disk errors and also restore the system health. This is one of the most preferred methods to solve BSOD error code. This command has three switches that repair the corrupt system image.
- To run DISM, open the Command prompt and Right-click to Run As Administrator.
- In the Command prompt box, type these three commands and Press Enter.
dism /online /cleanup-image /scanhealth
dism /online /cleanup-image /checkhealth
dism /online /cleanup-image /restorehealth
- This is a usual utility command and includes scanning to restoring the images files from the system.
- After hitting Enter, you must wait for atleast 10 minutes to half an hour. It might take even longer. Sometimes, the progress bar freezes at certain percentage for long, do not panic.
- Exit the Command Prompt and Restart your PC to make changes. After performing the system reboot, you might get rid of the Critical Process Died error.
Solution #6: Updated Drivers
One of the major reasons for Critical Process Died could be old and outdated drivers. Hardware manufacture uses various software to check the latest updates. In most cases, the users can choose to update these drivers.
Hence, we would recommend you to head to the official site of your device manufacturer and check for the latest driver updates. Do not download or purchase the beta drivers as well as the lousy hardware drivers.
To check if the Windows consist of corrupt drivers or illegal functions, use Microsoft Driver Verifier. It detects the bugs, illegal functions and catches the actions that cause the system to corrupt or show BSOD error.
Microsoft Driver Verifier is utilised by using the command prompt. Type the command “verifier” in the Command prompt window and hit Enter to check for corrupt files.
You can also use various third-party driver updaters that is capable of installing and updating the drivers with just a single click.
You can also check for the driver updates by following the steps below:
- Press Windows+X to find the Device Manager.
- In the Device Manager box, look for the files that have yellow exclamation marks.
- Right click the files and select Update Driver to check for any upgrades.
- A yellow exclamation mark may also occur if the driver is no longer compatible with the Windows after an update. In such a case, we recommend you to disable or uninstall such drivers. Install another driver that is compatible with your Windows version.
Another method to install driver updates on your system:
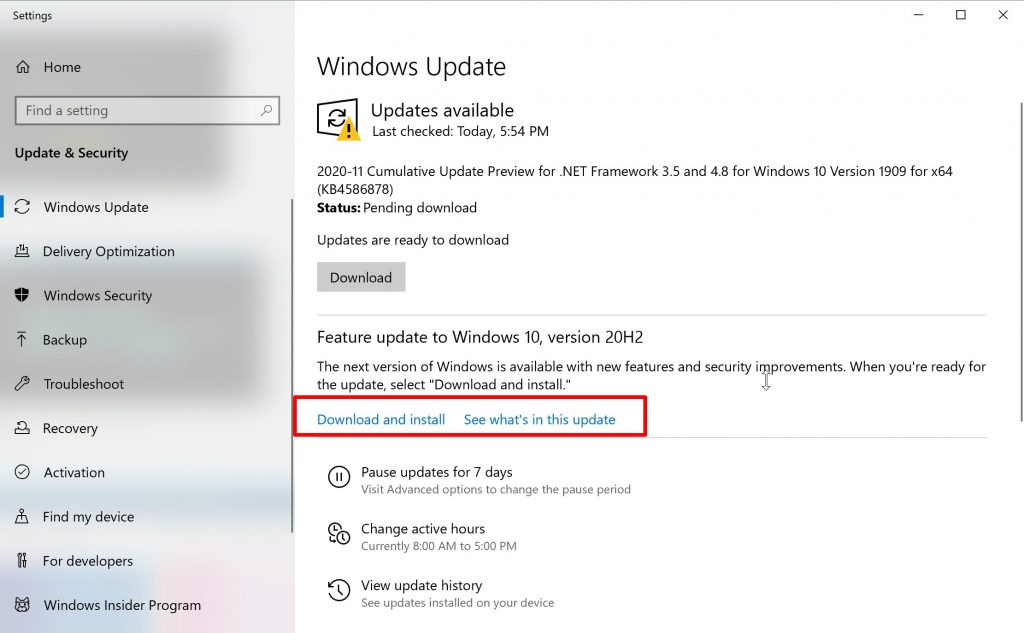
- Go To Settings and Choose Update & Security
- In the left side of the screen, select Windows Updates.
- Click on Download and Install to install the driver updates.
- Restart your PC and check if there any updates available.
Solution #7: Uninstall Windows Updates
If the Critical Process Died error with error code 0x000000EF displays on the screen, it could be due to the Windows update.
Hence, you need to Uninstall the Windows update and check if the issue still persists.
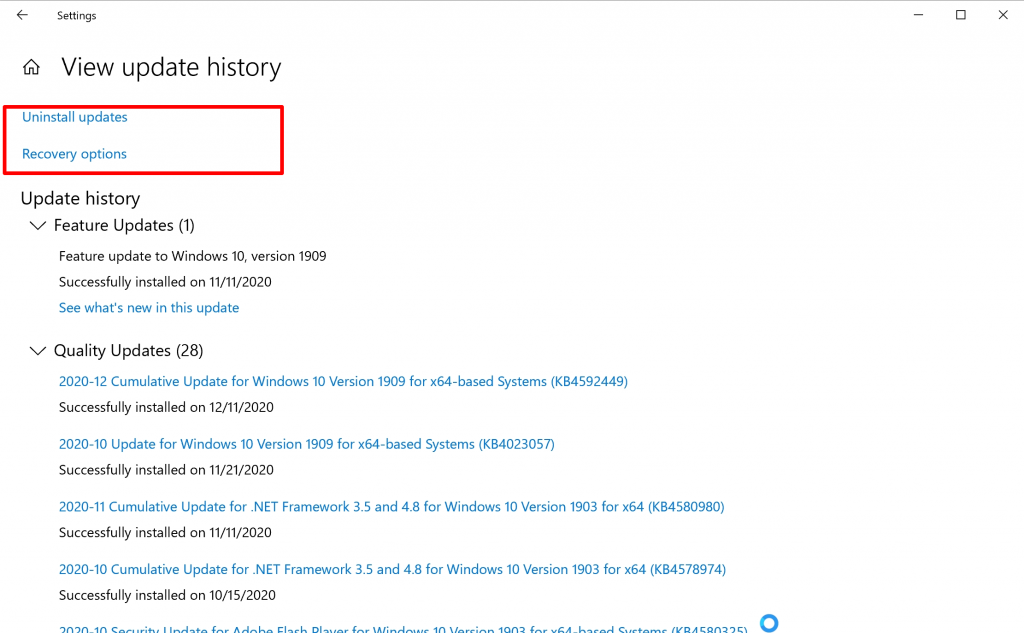
- Go to Settings and Choose Update & Security
- In the left side of the screen, select Windows Updates.
- Click on Updates History to check for all the updates on your system.
- Click on Uninstall Updates to uninstall the recent Windows updates.
- Restart your PC and perform boot to check Critical process died error.
Solution #8: Use Partition Disk Error Checker
Besides the other causes, one of the causes for Critical Process Died error could be some bad or poor partition disk errors. Some bad portion of disks blocks the file updates or processes.
We need a partition disk error checker to check for any faults or errors. EaseUS partition wizard, ACRONIS disk error checker and MiniTool Partition wizard are most handy disk checkers.
These partition disk error checkers locate the file location and check for any errors in these locations. After locating the bad errors, you need to fix these errors. However, these disk checkers do not offer fixes.
Hence, you need to look for another way to fix these errors. Before creating any fixes, we recommend you to create backup of your system.
Bonus Tip: Reinstall the Operating System
If any of the above tricks don’t work, the last resort is to re-install the operating system by uninstalling the older one. Create a backup of any documents, files or videos and anything on your drive or external disk.
Once you have installed the Windows10 completely, try to use Windows without any apps or installation of system drivers. This might give you an idea if the Critical process died error is resolved.
Conclusion:
In this article, we have shared that you needed to know about the Critical Process Died error. If critical_process_died error displays on the screen, you must know how to resolve it.
Share these tricks and methods with your friends to help them resolve the most common issue- Critical_process_died.
If the above given tricks don’t work for you, it’s time to contact the expert or technician of your device manufacturer to diagnose the problems.




![How to Solve [pii_email_fac20b28ca7fd86484f1] Error Code How to Solve [pii_email_fac20b28ca7fd86484f1] Error Code](https://techstorify.com/wp-content/uploads/2022/01/How-to-Solve-pii_email_fac20b28ca7fd86484f1-Error-Code-218x150.png)


